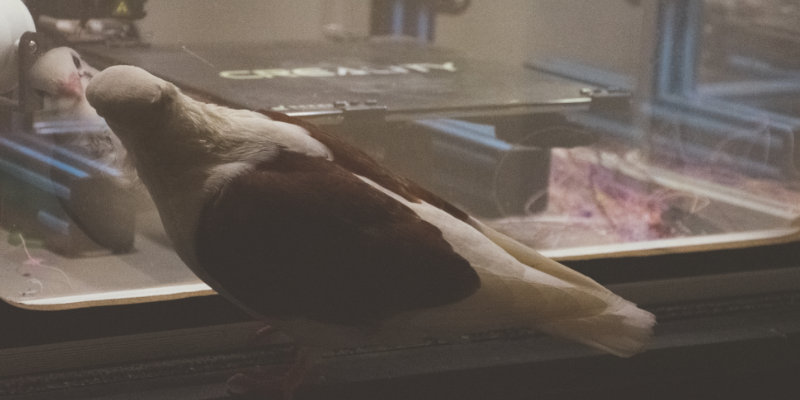
3D Printing For Pigeons (safety and tips)
3D Printing for pigeons – Introduction
I’m creating this article because as some of you might have noticed (or not), I/we make quite a lot of projects which are (also suitable) for our rescue pet pigeon Sophie (which btw also has her own blog). Some projects are made especially for her (and then often later-on shared with the public), while others are made with “Sophie Compatibility” in mind (meaning that the project originally wasn’t intended for our pigeon, but that it is designed in such a way that it is safe for her to be around or play with for example).
In this article I will talk about and explain how we do 3D printing safely for our pet pigeon Sophie, and I will give some tips about it from our perspective. Most of it will also apply to other birds and pets, but In this post I will mostly be referring to pigeons as the main ‘project target audience‘.
NOTE: This is quite a long and comprehensive article, and I won’t make a small summary for ‘TL-DR people‘, because in my opinion you should not even consider printing for your pigeon (or other pets) if you don’t want to take a bit of time to read something like this to ensure the safety and well being of your animal(s). I also do realize that some portions/approaches might be considered as paranoid or overly-concerned by some people, but I do not care. When it comes to the safety, well being and the health of our pigeon, I’m not going to take any risks, period.
DISCLAIMER
Please do understand that as with any DIY project, but especially with projects which you intend to make for your pet(s), that doing so is 100% at your own risk and responsibility! We do design our project to be as safe as they can be for our beloved pigeon Sophie, and often our own toys are even (way more) safer than the “pet toys” we can buy at pet stores locally here. But do keep in mind that our toys are designed with the behavior of Sophie in mind!
For example we know that Sophie would not break plastic by chewing on it, we know she would not try to eat such things etc. You should however ALWAYS keep an eye on your pet(s) when introducing new toys to them, especially when you’ve made them yourself. We also highly recommend to never let (any) pet(s) play with toys without supervision, just to be sure. We for example know that there are certain toys which we can safely give to Sophie even if we’re not watching her, but this is still 100% at our own risk (we just make sure that the toys which she gets absolutely can’t harm her).
Our (bird) toys, models and 3D printing in general are NOT suitable for destructive birds/pets!
NONE of our projects, 3D prints etc are intended to be used with destructive birds like parrots (or any other animal which could chew on them!). Pigeons are non-destructive birds, and so are some other (rescued wild) birds. But it is (yet again) 100% your own responsibility to assess if your bird/pet is capable/suitable to be playing with our designs and/or other 3D printed toys. We do not accept ANY liability for using our projects, files or whatever with or for your pets.
Even if you “just” have a pigeon (or other non destructive bird), then still make sure that you don’t have a pigeon which is actually of a destructive nature (it’s VERY rare, but can happen!). Please do realize that we do not recommend printing for other destructive animals (as in biting/chewing etc) either. Dogs for example could bite off pieces of plastic and ingest them.
Same goes for aquariums: IF your 3D print contains contaminants, or the filament contains toxic additives, you could easily kill your entire fish population with it. If you however do it properly, you could print for your aquarium (considering what we have seen over the years on the internet), but personally we do not recommend doing it.
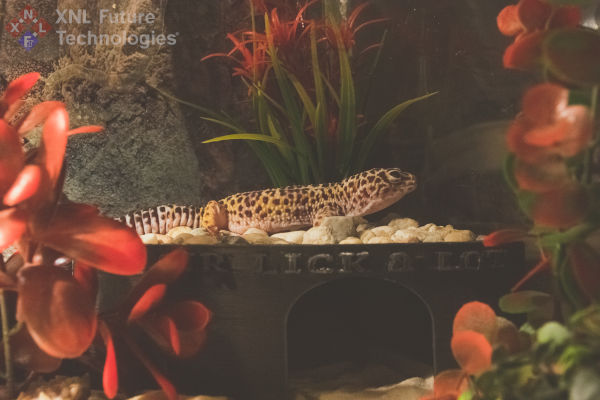
Stuff like printing a ‘hiding place’/house for your reptile should in most cases be just fine if you’re using PETG for example, make sure that it’s not contaminated in any way and that you clean it properly before placing it in the terrarium. I’ve made a home for our lizard (Leopard Gecko) which lived in his 3D printed home with roof terrace (accessible with a stairs on the side) for many years. However this would yet again be 100% at your own risk.
The 3D printer and the printing itself
This section is all about the 3D printer, the parts used/recommended for the 3D printer and what not to do when printing for your pigeon/pets. Especially when printing for or around animals which have a (very) sensitive respiratory system (like pigeons/birds), it is very important to take propper precautions to ensure that your pigeon stays healthy. However it’s not just about fumes when it comes to 3D printing for your pigeon.
Printing room/area (Do not print in the same room as your bird!)
What ever you do: Do not print in the same room as your pigeon/bird(s)! Even if you have an enclosed printer, we strongly advice against printing in the same room as your bird! The respiratory system of birds is very sensitive and much more susceptible to air pollution, VOCs etc and this can (and will) be a serious problem for your bird (potentially even resulting in it’s death!). Even if you’re printing with PLA at a ‘lower’ temperature, using a safe heat-break and are using an enclosure: I DON’T CARE, Just don’t do it in the same room as your bird. It’s best to not even do it on the same floor. And even better would be to print in an adjacent building instead (like a garage for example).
However we all understand that this is for lots of people just not possible. But at a minimum make sure that your bird is never in the same room as your 3D printer(s). And yes, we also understand that this can be difficult/annoying, but honestly? I don’t care! Its was quite the task to move our six 3D printers from my main office and workspace (where Sophie spends most of the day with me), to another room. But we did it anyway, we choose to take her into our home, then it’s also our responsibility to keep her safe and healthy, period.
Yeah, but my printer has a sealed chamber and air extraction system which blows it outside…. If you think that it’s safe enough to be printing with your bird in the same room, then that’s all up to you. I personally find it very stupid and not worth the risk. Do also keep in mind that even if you have a filter system or air extraction system, that there will still be particles and fumes in your printer right after the print has been completed. So once again: I still do not recommend printing in the same room as your bird (or other pets to be honest).
Resin printers a no-go in the same home as birds!
We all know how (or at least should know!) that even for us humans the resin used for resin printers can cause severe allergic reactions, it can increase the risk of cancer, cause severe respiratory issues, chemical burns etc. So you might already feel this one coming: This risk is even much much higher for birds when they are exposed to the fumes/vapors of resin printers! Even in a different room on the same floor or vapors coming from downstairs to your second floor can be more than enough to make your bird(s) very sick or even kill it.
I won’t go into any arguments about this either though, no need to say things like “But it should be safe if….” NO! In my/our opinion you should NOT take the risk for your bird(s) with that kind of stuff. You either want to 3D print with a resin printer inside your home or you want a bird in your home. In my opinion you can’t have both.
Small for note ‘resin nitpickers’: There are indeed resin based prints which could be safe for your pets, but you would for example need a ISO 10993 certified resin (aka medical safe resins), but they start at an average prices of around $200-$300/kg! Considering this is a very expensive investment which still poses risks when not done perfectly correct, I will yet again state: No resin printing for pets, period. Even just the residue on tools or printer parts from resin printing and the post processing of it can lead to serious skin irritations and respiratory issues in us humans, and thus are even a bigger risk for the much more sensitive pigeons/birds/pets!
Perfect timing! While I was writing this article, this video was uploaded and randomly suggested to me on YouTube. It explains many of the (extreme) dangers involving resin 3D printing very well. I would highly recommend watching that video if you are into resin 3D printing, or if you are wondering why we are so much against doing it around or for sensitive animals like birds for example.
What type of printer (and parts) to use? (and PTFE/Teflon & lead risk!)
Well it should already be clear that I would recommend to only use an FDM (Filament based) 3D printer😉. It however doesn’t really matter if you’re using an Bambu Lab, an Creality Ender 3, an Creality CR-10-SE, a Prusa MK4S or an XNL 3D Pro (of which the frame is based on the Ender 3 V1 btw). As long as it’s a decent 3D printer which is decently calibrated and produces with good consistent quality prints, but more about that later on.
Extruder type and heat break (PTFE “TEFLON!”)
HOWEVER, what does matter (and not just in regards to your bird’s safety but also to minimize your own health risks when printing at higher temperatures), is that if you have an 3D Printer like the Ender 3 V1 which uses an bowden extruder, that you make sure that you either have (or install) an All-Metal-Hotend.
I won’t go too much into detail about all-metal-hotend’s in this article, but an all metal hotend will simply put basically prevent that the PTFE tube will touch the nozzle (and thus be deep inside the hot end). The PTFE tube is the tube through which the filament is guided into the nozzle. This is for example done by using an titanium heat break (‘tube’) between the nozzle part and top part of the hot-end.
This is particularly important because those ‘filament guide tubes’ are often made of PTFE because PTFE has a very high melting point and a very low friction. However PTFE (of which Teflon is a brand name!) will release DEADLY fumes for birds when it is heated to certain temperatures! (which is also why you should not ever cook with non-stick/teflon pans in your home if you have a pet bird!). So if you have a 3D printer which uses a bowden extruder, please do make sure that yours has an ‘all-metal-hot-end’ if you are printing in the same home as your bird(s)! I personally would also recommend to replace your PTFE tube with Capricon tubes, because those generally are a bit safer in terms of withstanding heat (you will still need to replace the hot-end if it’s not an all metal one though!). Important ‘side’ note: Fumes produced by overheated PTFE (tube) is also VERY bad for humans, not just for pigeons/birds!
At what (print) temperatures does my PTFE/Bowden tube becomes dangerous?
Well it depends on your bowden tube, the quality/brand of it, and even if it for example is an ‘off-brand-chinese-one’. But generally speaking PTFE/Bowden tubes will start to cause issues when heated to around 260°C. However if you are doing longer prints at a nozzle temperature of around for example 220/240°C, then you are already fairly close to that ‘safety limit’ for the PTFE tube. Especially if you consider a temperature overshoot here and there and the extended time the tube is exposed to that temperature. And thus therefor it is extremely recommended to replace your hot-end if you don’t have an all-metal-hot end on your bowden extruder printer.
How do I know if I have an bowden extruder printer or not?
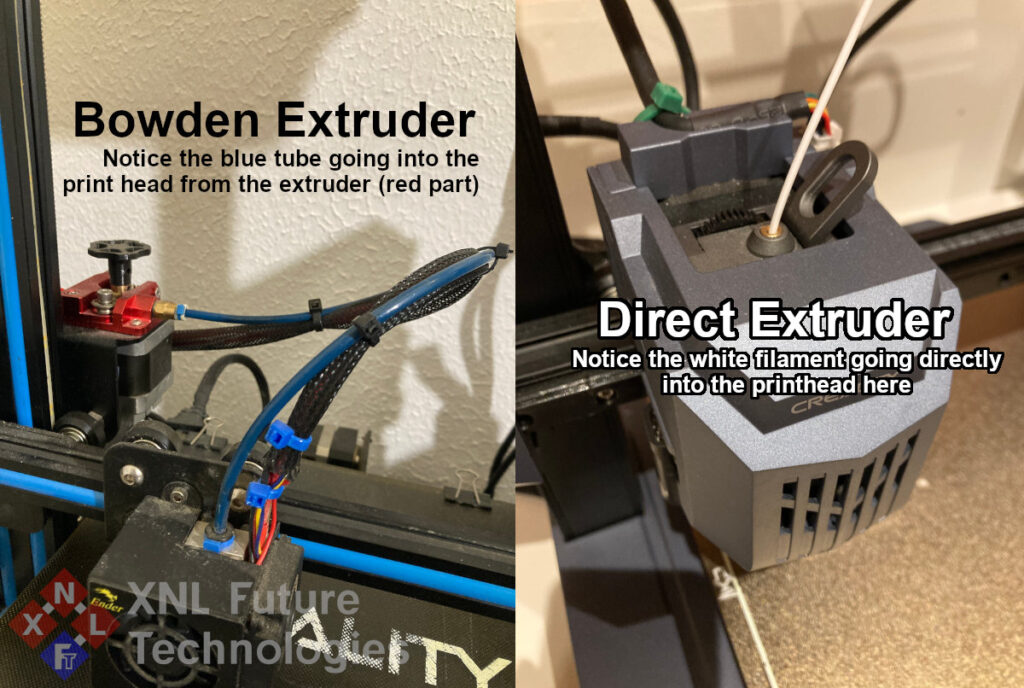
Well that is very simple to see actually. There are basically two types of 3D printers for filament-based 3D printing: Bowden Extruders and Direct-Drive-Extruders. And recognizing them is quite easy: If you load your filament directly 😉 into the print-head, then you have a Direct-Drive-Extruder. If you have to put the filament into the printer at a ‘different location’ on your printer and then feed it through a tube which is going to the print-head, then you have a bowden extruder on your printer (photo of two of our printers bellow illustrating the difference).
Are all bowden extruder printers at risk to these PTFE fumes?
No, there are quite a few printers (or upgraded printers!) out there which don’t have this issue. If you don’t know if your printer has an all metal hot-end, then it’s highly recommended that you google your printer and it’s hot-end before you resume 3D printing (anything) in the same house as your bird(s).
Nozzle (Brass vs hardened steel)
If your 3D printer has a brass nozzle, then I would also like to recommend you to replace it with a hardened steel nozzle if you’re planning to use that printer to print stuff with for your pigeon (or other pets). Brass nozzles are mostly made of copper and tin, but some brass has small amounts of lead and/or arsenic in it. And despite the fact that the risks of this being transferred into the 3D prints is relatively low, I personally would just not take the risk, especially considering birds are very sensitive to lead poisoning.
If you for example would want to print food-“safe” prints, you would also have to use a hardened steel nozzle, so why not take the same precautions for your beloved pet😊? And on the upside: hardened steel nozzles will wear down significantly slower when printing with abrasive filaments like for example glow in the dark.
NOTE: Do make sure to read a bit or watch some videos about using hardened steel nozzles, because it could be that you would need to increase your printing temperature slightly because hardened steel nozzles are generally less heat conductive than brass nozzles.
And for the nitpickers out there: YES, chances are low (minimal) that your pigeon will get lead poisoning from using a brass nozzle, but I DON’T CARE! Minimal still means: “Lead poisoning risk isn’t 100% eliminated here“. And that is what matters to me/us: Minimizing all risks to the maximum extend to ensure the safety of our pigeon.
Clean print bed & bed-adhesives
I would recommend against using ANY type of bed-adhesive-assistants (like for example 3DLac, hairspray or whatever) when printing for your pigeon on your 3D printer. I personally would recommend to use a fine-tuned printer with (near) perfect heat bed leveling and to use something like PEI Build Surface/Heat bed. Even just a glass heat bed at about 45-60°C with PLA on a good calibrated 3D printer should do perfectly fine without any adhesives.
If you do have to use adhesives for your own (other) 3D prints and/or materials, then I would strongly recommend to get an additional build-plate which you would ONLY use for your pigeon/pet. If you REALLY have to use an bed-adhesive assistant (which in my opinion just means you haven’t calibrated/leveled etc your printer properly! or that you’re using crappy quality filament), then I would suggest to only use 100% non-toxic natural based glue-stick products. But yet again: I strongly advice against doing so, because if you are putting adhesive assistants on your build plate, they will transfer onto (and even INTO) your 3D prints! And thus could potentially expose your pigeon to these ‘assistive additives’.
3D printer configuration and tuning
To make 3D prints which are as safe as possible for your pigeon, you should make sure that you calibrate, fine-tune and level your 3D printer as perfect as possible. This will not only ensure perfect print looks, but this will also prevent layer separation in your 3D prints for example. It is of course also important to make sure that your 3D printer doesn’t have extrusion problems (either under or over extrusion). As for settings, personally I prefer to print at a nozzle temperature of 220-230°C with either a layer height of 0.2mm or 0.15mm (depending on the model detail), and a build plate temperature of around 60°C when printing for our pigeon (with PLA). NOTE: These settings obviously also depend on the filament (brand and type) used and your printer.
The 3D print filament
Like already mentioned earlier, I would not recommend using resin based printing and/or prints for pets (in ANY way). Therefor filament printing it basically your only other (DIY/home) option. However also with filament printing goes: Not all filaments are safe to use for pigeons or to print with when you have sensitive pets like birds in your home. I basically already told that you should not even consider printing in the same room (or even better: on the same floor) as your pigeon, but there is quite a difference in safety, stuff like VOCs and particle emissions caused by different filament types. I could go into this topic with all kinds of graphs, test results etc, but there are already quite a lot of good articles (and videos) online when you would for example google: ‘3D Printing VOCs‘. Considering that this will already be quite a long article, I will not go too much into detail about all the filaments and the possible health risks involved with some of them, but I will give some basic tips about what you can use for your pigeon.
What filaments to use
Personally I would recommend to only use PLA or PETG when 3D printing for your pigeon.
PETG is often generally considered to be the more ‘food-safe’ option (this does depend on the manufacturer and the specifications of the specific spool though!), but it needs higher temperatures, often is a bit harder to work with and is generally sharper (on the edges) than PLA.
PLA prints at a lower temperature, is generally easier to print, is (usually) much less demanding in regards to bed-adhesion, it’s most of the time available in a much larger range of colors (we’ll get to why this is so important later on) and PLA is often also significantly cheaper than PETG.
Some other filaments like ABS could be considered safe to user after the print is done, however printing ABS is quite the hassle for most people, and more importantly: It’s a quite ‘dangerous and toxic’ filament to print, not only for us but yet again even more so for sensitive animals like birds. I could yet again go into al the technical details about every other filament type, but lets face it: You also have google 😉 (which is most likely how you even ended up here).
And thus that’s why I would recommend to only use PLA or PETG when printing stuff for your pigeon. NOTE: From here on I will be referring to PLA when I’m talking about filament, because that is basically the only filament we use for our pigeon Sophie.
DO NOT use filament which could possibly contain toxic/harmful additives
I would strongly recommend against using filaments which could possibly have toxic or harmful additives in them. This is a bit difficult to describe, explain and list here, because as you might already know; there are almost an infinite amount of different PLA filaments on the market these days.
Basically I would recommend not use ANY other (PLA) filaments for your pigeon than the normal (colored) PLA or the glow-in-the-dark PLA (ensuring the glow in the dark PLA is from a reputable brand which uses non toxic materials, because not every glow in the dark filament is made equally!). Which means that I would for example would not recommend to use (PLA) filaments which have wood, metal, copper, glitter etc in them. Only normal ‘basic’ PLA.
NOTE: Even just regular (colored) PLA could potentially contain toxic chemicals/additives to add the color or to alter the PLA composition (for example to make/market it as PLA+/PLA Plus or whatever they come up with next). So do make sure that you only use PLA from a reputable brand of which you can either get the list of additives, or where you are absolutely certain that they didn’t used any harmful additives.
Designing/modifying your models (before printing)
Obviously you should not print any models or parts which are small enough for your pigeon to (accidentally) eat/swallow. We all understand that eating plastics isn’t good for you, but that’s not the only thing you should take into account when 3D printing for your pigeon. There are quite a few other aspects which you should take into account if you are considering to 3D print projects for your pet pigeon.
Edges and sharp corner
When designing (or modifying) the 3D models there are a couple things which you should take into account. I would personally recommend to minimize sharp (90 degree) edges where possible, and I would also recommend to make sure that there are no sharp corners or pointy parts in your model either. These are all parts which could seriously harm your pigeon when he/she for example bumps into the model while playing, lands on it etc. Sharp edges on (larger) models could for example also cause cuts in the feet of your pigeon when he/she stands or lands on your model. I have made some illustrative examples of what not to do and the alternatives bellow.
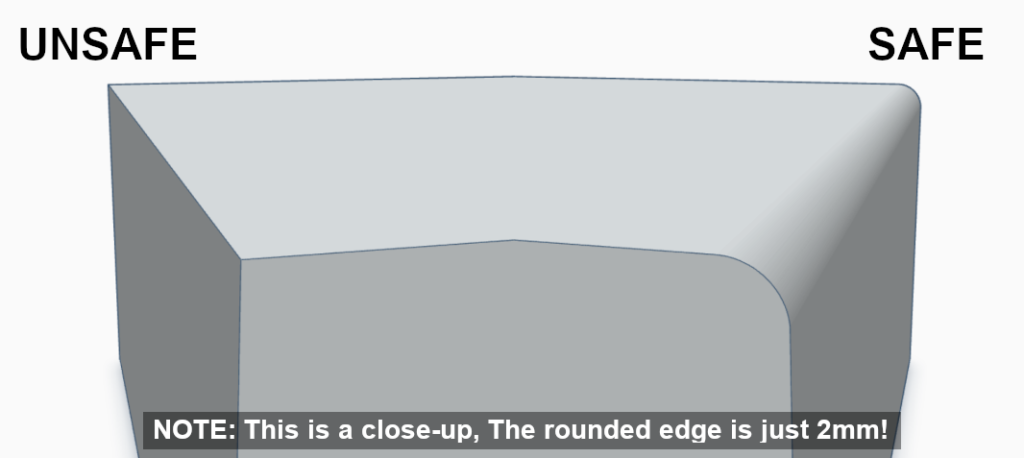
In this illustration you can see that rounding the sharp edge of a model can in some cases also instantly remove the sharp and pointy corner. Especially these kinds of corners (on the left in this illustration) can be a problem if you have a more active and playful pigeon. Our pigeon Sophie runs around a lot and quite fast when playing with one of her stuffed animals, if she would then for example run into one of those sharp pointy corners with her belly, it could seriously injure her. Also do note (as stated in the illustration) that the rounded edge doesn’t even have to be that much. In the illustration it’s also just 2mm.
I will have to say though, that 90 degree edges in most cases won’t be a problem, as long as they blunt. The pointy corners on the other hand are a real risk though. TIP: In most cases you can also make the edges a bit more blunt with sanding paper, you will however often be able to notice this when you are done.
(Don’t Use) holes in your models
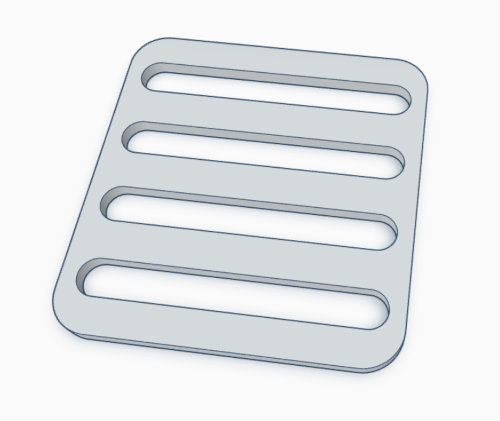
Obviously you can use holes in your models where needed, but it is however very important that you make sure that your pigeon can’t get stuck with it’s feet or beak inside the holes.
A very obvious example of this, is the ‘grill’ on the left which I quickly made for this article. You should not use a model like this for your pigeon. Simply because he/she could get it’s feet stuck in it and break one of it’s toes (talons).
If you really have to make holes and such in your model (for your pigeon), then please make sure that it’s absolutely impossible for your pigeon to get stuck in them (in any way).
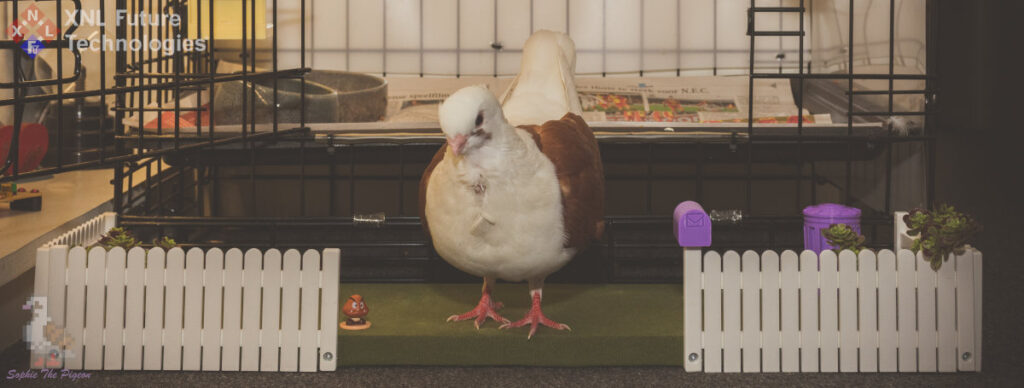
A very good example of this, is the fence I’ve made a couple years ago for Sophie’s ‘front yard’. In the picture bellow you can clearly see that it looks like a regular fence, but if you pay close attention, then you will also notice that there are no sharp corners she could bump into on the fence at all, and that the gaps between the ‘boards’ are too small to get her feet stuck between them if she would step on/over the fence (which she has done many times already).
Models or projects with moving parts
This should already be quite obvious but I did want to include it anyway. When making projects with moving parts (either manual or electronically) you should obviously make sure that there is absolutely no way that your pigeon could get stuck in it or get hurt due to it. Also never make a ‘moving project’ for your pigeon for which you will claim: “Well it will be fine, because I will only let him/her play with it under supervision“. It only takes a few seconds for something to go wrong, you could be doing a ‘quick run’ to the toilet, suddenly receive a phone call, the doorbell rings or what ever, just don’t put your pigeon at risk with something like that.
Design with colors in mind
Yeah, I know! This kinda sounds like a sentence Yoda would say at Woodstock😂. But what I’m trying to say with this, is that if you really need the model to have several different colors, then try to make the model either multi-part where each differently colored part is a new print (in a different color filament), or design the model in such a way that you for example can pause the print mid-print to swap (filament) color. We often do this for prints which we absolutely can’t paint due to safety concerns for example. In such cases you could for example make it so that colored details are screwed on from the back, or they are snapped in, or you can make it so that differently colored parts slide over each other etc etc. We currently have quite a few projects already lined-up to be released around the end of the year (2024) which utilize these techniques, so make sure to keep an eye on the Sophie’s Collection section to see this ‘in action’😊
Printing – Take printing orientation into account
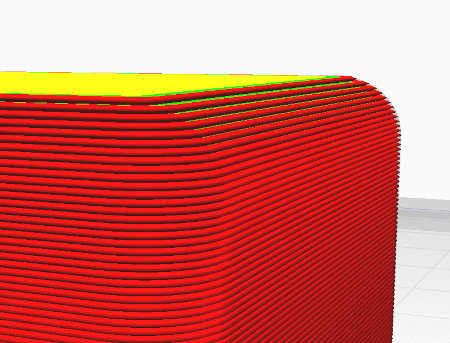
Another very important thing to take into account is the printing orientation, because filament (FDM) printers are basically creating ‘objects’ by printing each layer of your model on top of each other, and this is also it’s Achilles heel!
As shown in the (partial) screenshot of the slicer software on the left here, you can clearly see each layer being stacked on top of each other.
These lines are basically the weak spot of your 3D printed model because it could snap/separate at these lines. And despite that this most likely won’t be much of a problem on larger models (given that you don’t over-stress them of course!), this can be a serious issue when you are 3D printing an object for your pigeon which has small details in the vertical print direction at the top of the model.
I’ve made a small demo model bellow to explain this issue a little bit better. Here I have made a simple name-tag for Sophie, and if we would print it standing upright, there is no problem with this model because all the (small) details of the letters are part of each vertical layer, and due to that part of the entire model.

If you would however print this same name-tag while laying flat on it’s back, then the dot on the i will most definitely be a potential safety risk for your pigeon. Because when doing so, the i will be a small part of plastic (extrusion) on top of the ‘large’ model. This basically means that the dot of the i will have ‘minimal contact area’ with the rest of the model and thus it’s not integrated into the printing lines of the model itself.
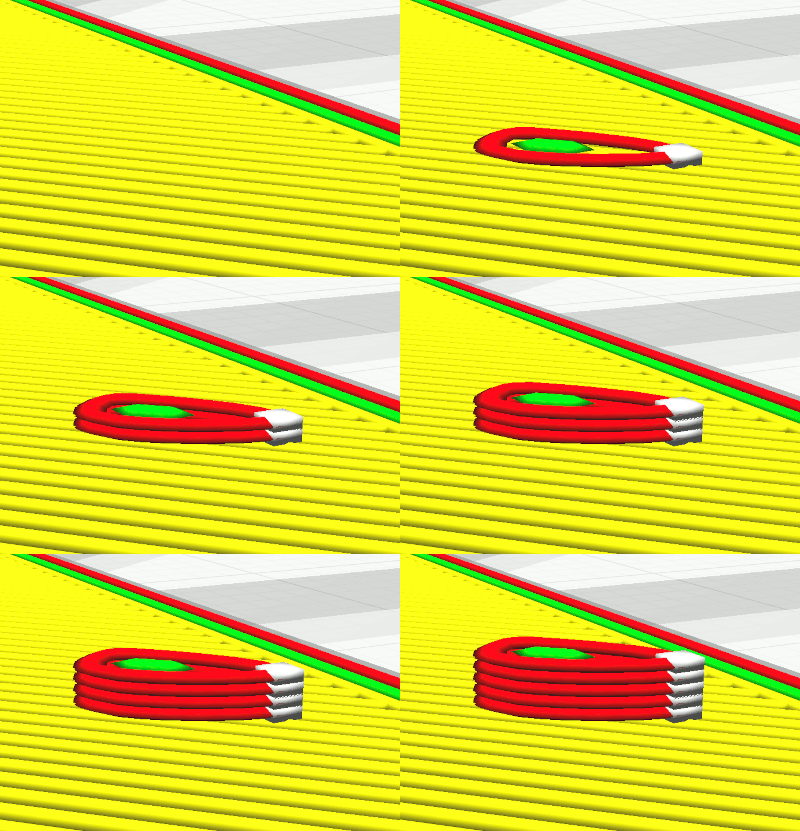
If you look at the animated illustration on the left (which is a close up of the dot on the i with the Sophie name-tag laying down on it’s back), then you might even notice that the back plate of the name-tag has already been ‘finalized’ when the dot of the i is being printed on top of it.
This means that this part isn’t connected to the internal structure (the infill) of your model either, it literally is just put on top of your model and ‘melted onto it’ (a bit!).
And this is quite problematic for small details, because if you yourself would put a little bit of pressure from the side on this dot, you can easily snap it off from the main model.
So this definitely would not be hard to do for your pigeon either when pulling or pecking at it with it’s beak. If such a small (and potentially even sharp) piece of plastic then falls off, it’s obviously quite easy for your pigeon to accidentally ingest it. Especially because such small parts could resemble a seed for your pigeon.
Therefor we highly recommend to design (or modify) the models you are going to print for your pigeon to eliminate such details which could present a risk to your pigeon, or that you ensure that you print in the correct orientation to prevent such issues.
NOTE: The models we designed for Sophie (and release on our website) are designed in such a way (and pre-orientated in the STL files!) that these risks are limited as much as possible😊. Do however always double check all models you intend to print for your pigeon, and also double check the models after printing if there aren’t any issues with the model which could be a possible risk for your pigeon (including our own models!).
Things you should not print for your pigeon/pets
You can print a lot of things for your pigeon, from perches to furniture and toys. However you should not print things like a drinking bowl or anything else which holds liquids or foods which contain moisture (like vegetables, fruits etc). Like I’ve explained in the previous chapter(s): 3D prints consist out of thin layers, and these layers are a serious risk for bacteria and molds to grow! Even if you would print at the finest detail and sand down your model completely, it will still have minuscule holes and grooves which will cause hygiene issues.
You could (if taking all the other tips into account!) 3D print food containers for your pigeon, if you only use it for dry food like seeds. However, don’t use it if you add supplements (powder) or medicine to the food though! And when you do print something like a (small) food container for your pigeon, then do make sure that you replace (re-print) it regularly to ensure maximum safety and hygiene.
Finishing/post processing the 3D prints
When it comes to post processing the 3D prints for your pigeon, its (obviously) very important that you remove all supports, sharp (brim) edges and all other tiny ‘production remains’ from your model(s). I would recommend to for example check your model(s) up to at least three times after removing all the supports to confirm that nothing has been left behind. And if you do still find a small piece of support? Start over with the three checks, until there is nothing but a perfectly safe and cleaned print left 😊.
Putting the multi-part 3D print together (safely)
When designing or putting together a multi-part print for your pigeon (so you can make it multi-color for example), it’s very important to think about the safety of your pigeon early on. I would recommend to design your models in such a way that you can use screws (in for the pigeon unreachable places) to assemble it, that you use/design a (tight fitting) snap-fit solution or that you design it in such a way that you can glue it together (in my opinion not recommended though!).
IMPORTANT WHEN USING GLUE
Make sure to only apply glue on places where the pigeon absolutely can’t reach it (to for example ‘chew/peck it off’), make sure that it has cured 100% and thus the off-gassing is 100% finished! Like stated, I would not recommend to use glue AT ALL on projects for your pigeon (or other animals), but if you have absolutely no choice, then I would recommend to let it cure and off gas for a long period outside. IF I for example really have to glue something, I’ll let it stay outside for sometimes up to 3 to 4 weeks to ensure that there are for our pigeon Sophie absolutely no more harmful gases/fumes coming off of it
Welding/Melting Pieces Together
An alternative method to put your model together would be to use a soldering iron (with a clean, lead and solder free tip which you only use for this purpose) and setting it to around 180-190°C and then gently swiping the soldering iron along the seams of the model. Do note though that this will most likely require additional cleanup like sanding to make it smooth again, and that this will most likely be noticeable if not done perfectly. This is also something which you should never do when your pigeon is in the same room due to the fumes this can/will produce. It is also important to note that this will only work if your model it’s parts already align perfectly and that such ‘welds’ are not suitable for parts which will be put under stress/strain (and thus only usable for decorative parts/models).
DO NOT use a 3D pen to join or fix 3D prints (for your pigeon)
Please do not use a 3D pen to join your 3D prints or to fix holes in the 3D prints which are intended for your pigeon! Most of the time when using a 3D pen the filament in the pen will (obviously) get hot enough to melt, but if not done correctly (read: perfectly!), the heat of the filament coming out of the 3D pen might not transfer enough heat to the actual model(s) itself to actually bond (fuse) properly. Which could not only result in your model falling apart, but even worse: result in small parts (which you’ve added with the 3D pen) falling off and possibly ending up being accidentally eaten by your pigeon. I’m not saying it’s impossible to do with a 3D pen, but you absolutely have to know what you’re doing! You have to make sure the temperature is perfect, that the extrusion speed of the pen is set correctly and that you are moving it at the ‘perfect’ speed along the seams to ensure an optimal fusion of the plastics. Due to all this, I would generally not recommend taking the risk.
Decorating (painting) the 3D print
NOPE… just NOPE. DO NOT paint the models which you are going to use for you pigeon. Like explained above already: Either design the models in multi-part to print them in different colors, print them in multi-color by swapping filament mid-print or just print them in a single color as-is. But please do not expose your pigeon to paints on it’s toys etc! Yes I know there are bird safe paints, biological/natural paints etc… but just don’t do it please, think about the safety and health of your pigeon.
No Small Stickers on your 3D prints
Same goes for putting small stickers on your 3D prints which your pigeon could accidentally pull off and swallow. Stickers often contain glue or other adhesives which could cause serious health issues when ingested (by an animal), so please don’t put them on models/3D prints intended for your pigeon.
Replace 3D prints (which get dirty) regularly
Yet a quite obvious one, but I do yet again want to include it in this full article for completeness sake. It’s recommended to regularly replace 3D prints which get dirty due to for example bird droppings. We for example have 3D printed our own sleeping perch for Sophie because it’s a true hell to find a slice of tree stump cut in half at the correct size for a pigeon. Due to this we decided to design our own so that we can easily replace it when it’s getting ‘too old’ or to dirty to properly clean for her (while ensuring that she would still have the same sleeping spot she is used too, and thus not stressing her out for her ‘bed’ suddenly being gone or different).
However due to the fact that she sleeps on this, she also poops on it while she is sleeping (which is quite normal for birds sleeping somewhere where they are not nesting). This does obviously require daily cleaning, but every now and then we just replace (reprint) the perch completely to prevent bacteria building up between the layer lines.
Obviously you don’t have to replace things regularly if they aren’t getting dirty, but I would still recommend to check the toys and/or furniture you’ve 3D printed for your pigeon at regular intervals to check them for wear/deterioration etc and replacing them when necessary.
Incorporating electronics in your (pigeon) projects
Some of our projects (and upcoming projects) for pigeons include electronics, some are simple and only include an LED or two, while others include LCD’s, PCB’s and even mechanical parts like servo’s and motor’s. If you however design or make projects for your pigeon which include electronics, then PLEASE do make sure that there is absolutely no way that your pigeon can reach any of the electronic components, the PCB(s), the motors, the wires etc etc. Obviously pigeons don’t understand the dangers when pecking at (or licking) electrical connections, and even if those connections are “just” 5Volts, they could seriously hurt your pigeon (or worse). So again: PLEASE be extremely careful and alert when incorporating such techniques into your pet projects!
Always confirm information on the internet
Please always do your own research and confirm information you’ve found on the internet. Especially when it’s for example about the safety of you, your children/family or your pets! In my article I clearly stated several times that I’m sharing my/our own experience, and that I would recommend something. Obviously I do stand by the information I’ve spend about 4 days on to put together in this article. And I hope you can also agree with me when I would say that most of the claims and statements I’ve made in this article are ‘backed-up’ with some additional information or reasoning.
I have however unfortunately also found quite a few websites which made claims like for example: “any chew toys, bowls, balls, and aquarium accessories made out of PLA are safe and won’t harm your pets.“😳. Well If you have read my article, you might very well understand that this claim could not be more wrong and is even harmful if taken as factual information by some 3D printing pet owners ☹️. So please ALWAYS use your common sense, and do some additional research on such topics.
Happy (and safe) printing
Obviously it is impossible to cover every topic in regards to 3D printing for pigeons, but I do hope that I’ve covered the most important aspects of it, that I haven’t forgotten anything and that this article has provided you with lots of information in regards to safely printing for your pigeon (or other pets).
If your pigeon is also a non-releasable rescue pigeon (like our Sophie is), then of course thank you for taking him/her in and giving him/her a second chance at a wonderful life😊.
One more time: Just make sure to take all safety tips into account, use your common sense, adapt your approach and designs to the behavior (and/or needs) of your pigeon, and of course do realize that 3D printing for your pigeon and/or using the tips and information from this article is 100% at your own risk and responsibility.
Questions and discussions about this topic and article
If you have any questions, or want to discuss this topic more in-depth, then I would like to request you to do so on here on the forum. There it will be easier for others in the community to keep track of the conversation and to help out each other😊 Thank you for understanding.

