
XNL Breadboard I/O
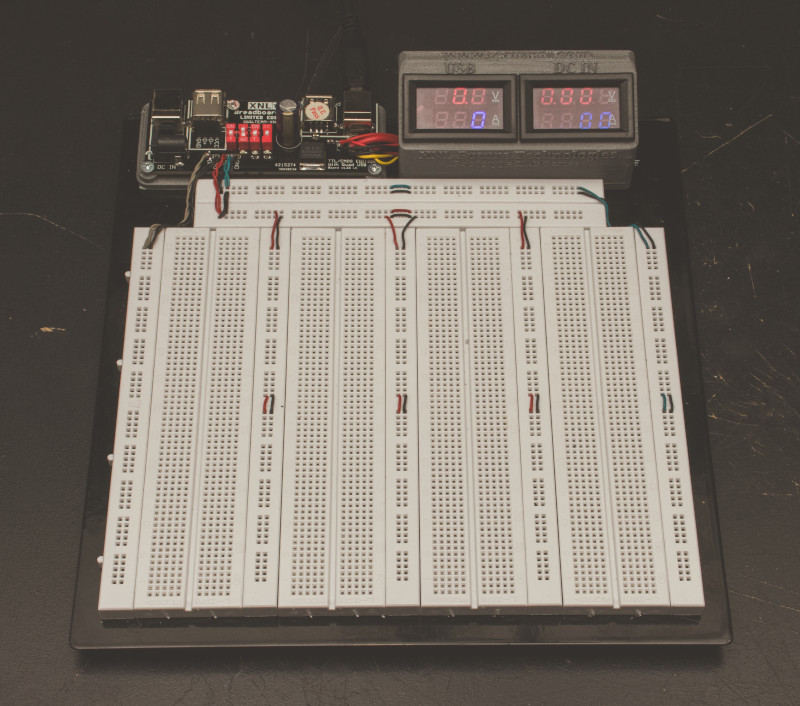
The XNL Breadboard I/O is an solution to always have your breadboard ready-to-go by just having to plugin one USB cable to get up-and-running with your project(s). This also makes it super easy to quickly switch between projects/breadboards or to resume the next day with your project without having to ‘re-setup’ the power from your lab power supply, the jumper wires for your power strips etc etc.
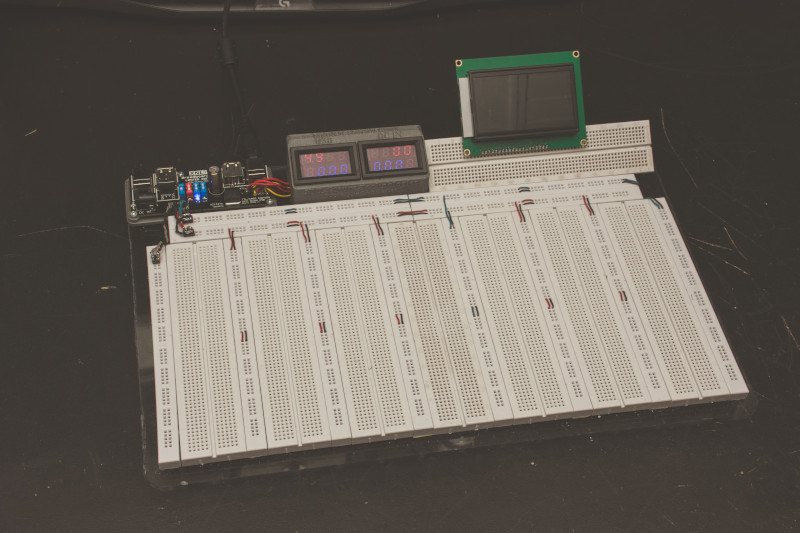
TIP: In a YouTube video here I also show how to build the large XXL breadboard shown in the photos.
Some of the features of an Breadboard with the XNL Breadboard I/O:
– It’s very easy and fast to get to work by just plugging-in one USB cable.
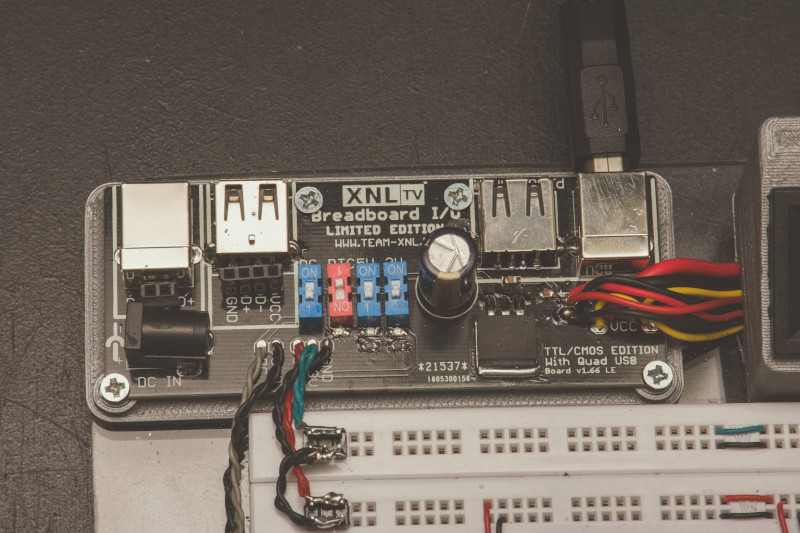
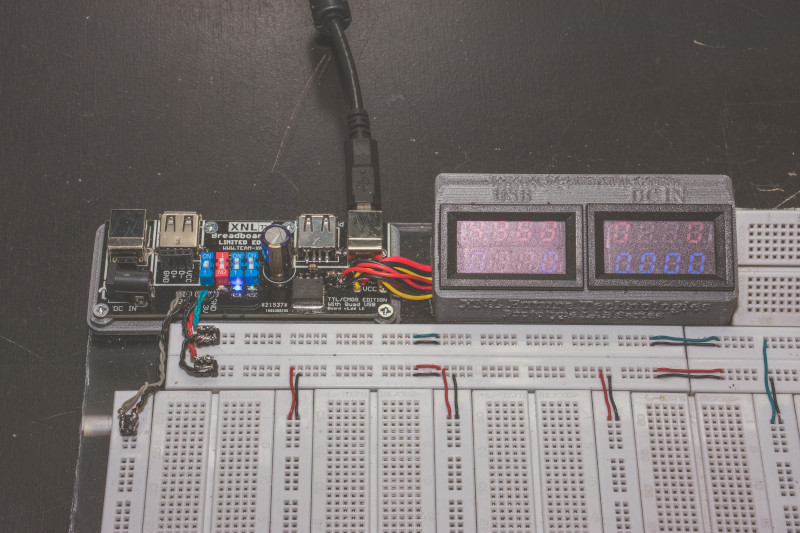
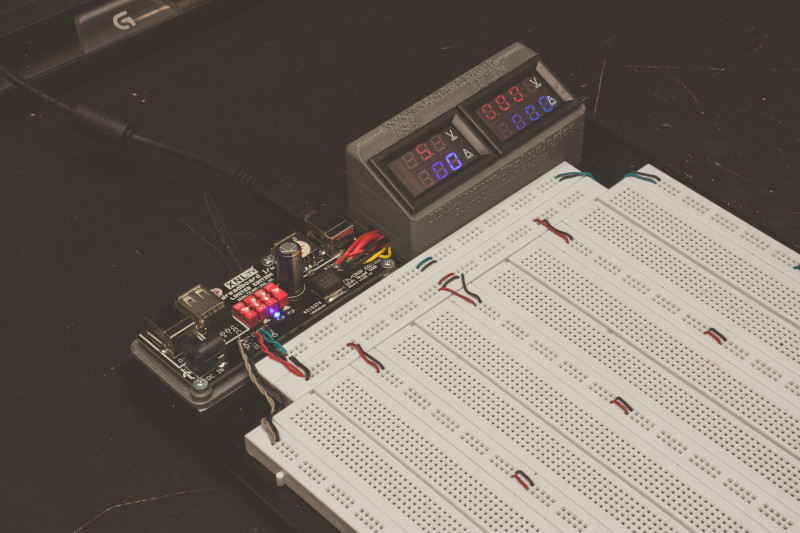
– Two onboard voltage and current displays (one for the USB and one for the DC Jack)
– A stable onboard 3.3V regulator (LM3940)
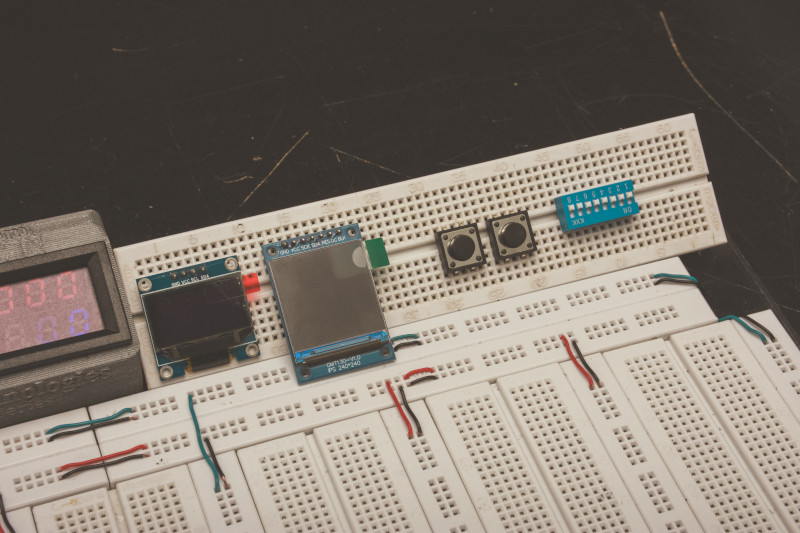
– Easy to turn power rails on and off (if using the DIP Switches)
– Onboard 500mA over-current/short-circuit protection (which can be bypassed)
– 2 USB Breakouts (1X USB A, 1X USB B)
– DC Jack input for other voltages like 12V, 24V etc.
“Multi Pack” NOTE:
This download also contains the following 3D Printable parts: The enclosures for the displays, a drill stencil for the display enclosure, A closed bottom for the display enclosure, the XNL Breadboard I/O PCB Baseplate and a 40degree angled mount for an additional breadboard strip on the top of your breadboard (see photo’s for the purpose of this)
Download Size: 5mb
By clicking on the 'I Agree & Add to download basket', you confirm that you have read and agree to the License shown at the License tab.
- Information
- License
- PCB Order Instructions
- Features
- Bill Of Materials
- Known Bugs & Issues
- Reviews (0)
Information
I often got discouraged when I just quickly wanted to test something like a small circuit on my breadboards because it always required me to hook up my lab power supply or using jumper wires from my development board. And then I also had to make all the jumper wire connections to ‘complete’ the power rails/strips. And often also had to hook up one or two multimeters to keep an eye on the voltages and current(s).
And that is why I came up with the XNL Breadboard I/O solution. It covers all those issues at once and more. It also has an onboard 3.3V regulator, a self recovering 500mA short circuit protection on the 5V rails (a PTC which can also be turned off by the way), a DC Jack for other power sources (if needed), and two USB connector break-outs (one for USB A and one for USB B).
Ever since I/we started using our breadboards with this setup on it by default, it greatly improved our startup/setup time, but it’s also a major convenience when we are switching between projects. When switching between projects/breadboards, all we have to do is unplug one USB cable, ‘toss’ the breadboard in to the cabinet, get the other project, plug in one USB cable and we’re back to work again already.
YouTube Video
There is a YouTube video of me building the XXL Breadboard you’re seeing in the photo’s on this page which you can watch on my YouTube channel here.
DIP Switches ‘Issue’
Please make sure to read the documentation and/or at least watch the video to learn more about why DIP Switches might not have been the best choice when I designed this board over (almost) 10 years ago now. I however like mentioned didn’t had any issues with them at all all these years, but please do make sure that you make a well informed decision on if you want to use the DIP Switches or that you for example instead would like to bridge the DIP Switch connections instead.
DC Jack Input only for DC
I recently received a question on my YouTube video about my DIY XXL Breadboard if it would also accept around 15Volts AC for audio circuits, but the XNL Breadboard I/O is NOT suitable for handling AC. So I decided to include this information on here for possible future visitors/users.
License
BY DOWNLOADING, INSTALLING, COPYING OR OTHERWISE USING THIS PROJECT, PRODUCT, FILES OR ANY PART THEREOF (AND THE RELATED DOCUMENTATION) FROM XNL FUTURE TECHNOLOGIES, YOU ON BEHALF OF YOURSELF, OR ON BEHALF OF ANY ENTITY BY WHICH YOU ARE EMPLOYED AND/OR ENGAGED AGREE TO BE BOUND TO THIS LICENSE AGREEMENT.
IMPORTANT
Do note that all sections/'chapters' bellow constitute the entire license and that they are 'interconnected'. This for example means that if there is a section about Closed Source/Binaries License, that this doesn't mean that the rest of the license doesn't to those binaries. It just means that that section is specifically aimed at those files, while the rest of the license (where applicable) is also 'in effect' for those binaries.
(Additional) License(s) in Project, Product or Download
This project, product, the files etc in this download/these download(s) contain (one or more additional) license(s).
When you download this project, product, files, download(s) etc, you agree that you will read the license(s) included in the download and it's files, projects, products etc and that you will delete 'the downloaded content' if you can't (or don't want to) agree to the included license(s).
These license(s) will most likely be present in one or more of the following ways:
- As license agreement/EULA window (in compiled software for example)
- As License 'embedded' into the documentation (like a datasheet for example)
- As additional license file which can be included into the Download (or archive file like a zip file).
- As as 'commented text' in source-code or as 'additional license file' in source code.
Don't worry, this license or these licenses will not be 'sneaky hidden' or hard to find, these licenses can be found in their expected or logical locations (as mentioned in the examples above).
Commercial Use Allowed
Commercial use of this project, product, it's files, download(s) etc is allowed, which means that you are allowed to use it for own financial gain, there could be however (additional) restrictions included in a license (or licenses) which is supplied (within) the project, product, download(s) etc which limits the extent of how (far/much) you are allowed to use it commercially. By using, downloading or otherwise using this project, product, it's files and/or download(s), you confirm that you will first check the supplied content/download(s) for additional licenses to see if there (additional) restrictions which limit the extend of the Commercial Use Allowed Permission Clause, before using it for commercial purposes in any way.
A project/product which for example does allow Commercial Use within your company or organization under certain (licensing) conditions but does not allow you to (re-)sell the project/product would be XEWA™. When you consult the XEWA™ License (which is provided with, and build-into XEWA™), you will find this (additional) license information and/or limitations in the 'included license'.
If the project, product, code, files etc don't include any (additional) license(s), then you are allowed to use this project, product, it's files, download(s) etc, in any possible way for commercial use (including (re-)selling it. If there however is an (additional) license included with the project, product, it's files or download(s) you hereby agree that you will also read that license and accept that license prior to using the project, product or file(s), and that you will refrain from using the obtained 'content' in any way if you can't (or don't want to) agree to the (additionally) included license(s).
IMPORTANT NOTE:
Make sure that you also consult the rest of the license(s) to see if clauses/rules like Attribution Required or ShareAlike for example apply, because even if you are allowed to use the product for any type of commercial use, it could still be that attribution required or ShareAlike 'rules' apply.
ShareAlike
Our ShareAlike Clause means that if you are are for example allowed to share/redistribute modified versions of this project, product, it's files, download(s) etc, that you have to share it under the same conditions as this original work.
Some examples of what this means for you:
- If the rest of the license for example permits you to modify and then redistribute your own 'adaption/version' of this project, product, it's files etc, you would then need to comply with the following 'rules':
- If this original project, product, it's files or download(s) etc are 'open-source' (provide source code/files with it), then your modified version can only be published/redistributed if you also supply your (adapted/modified) source code along with it.
- This also means that you are not allowed to take a project, product etc with the 'ShareAlike Clause' in it's license from our website, modify it and then start redistributing or even selling it as 'closed-source' only.
- You are not allowed to 'remove' clauses or 'rules' from the original license (just to give an example: You are not allowed to remove the 'Attribution Required' or the 'Commercial Use Not Allowed' clauses from your version/license).
- You are not allowed to restrict the original license with additional clauses and/or rules of your own.
We can understand it if some developers/creators put a lot of effort in 'upgrading' existing works, but that they would not like our (for example) 'keep open-source also open-source on redistribution rules', but all I/we can say about that is: Sorry, but that's the 'game of this license'. If you don't like it, then just create your own stuff from scratch 😉
The ShareAlike clause (obviously) also remains fully enforced if you decide to redistribute unaltered versions, and thus the same 'rules and examples' as shown above would apply, but to the unaltered version/re-distribution.
Logo & Branding Copyright
XNL Future Technologies™, XNL TV™, XEWA™, TeamXNL™, SystemR36™, System166™, The XNL Ft logo, The XNL Future Technologies logo, The XNL TV logo, The E-Series "Flamingo Logo", The XNL E-Academy Logo, The Overkill Edition Logo, The XEWA logo, The SystemR36 Logo, The System166 Logo, The Sophie The Pigeon 8-Bit logo and others are trademarks or registered trademarks of XNL Future Technologies in The Netherlands and other countries. Other terms, project, product or brand-names and/or logo's may be trademarks of others.
XNL Future Technologies is not associated and does not claim to be associated with any company or product that might have been mentioned in their documentation unless explicitly stated otherwise.
Legal & Disclaimer(s)
SIMPLIFIED DISCLAIMER:
The use of our projects, products, schematics or other files is at your own responsibility and they are provided “AS-IS”, without ANY WARRANTY. Use of the content on or from our website(s) is 100% at your own risk. Please realize that most of the 'stuff' that we offer on our website is intended for the enthusiasts, and thus it is designed/meant to be adapted, expanded or adjusted for use in 'larger' projects. Or that it is meant as a basic guideline to get started on a project of your own. Some products that we used (or have used) internally in our company will be shared with the public so that others can enjoy these modules or products also. For all these projects, product, files etc goes: USE AT OWN RISK! Some projects or products that we use internally do not have build in security measures (like reverse polarity protection for example!), this is to keep the costs at internal (test) stages as low as possible or due to the fact that the product is intended to be used in only one particular way! Keep this in mind when using, building or even buying these projects or products. If you're not sure what you're doing or if you don't trust a certain product, schematic, sample or anything else: USE YOUR INSTINCT and DO NOT CONTINUE, If you DO want to continue working on or with the project, product, source-code, sample, printed circuit board, model, schematic etc: Again: AT YOUR OWN RISK. The same goes for using our software (either closed source or other included binaries): USE A YOUR OWN RISK.
OFFICIAL DISCLAIMER:
THE SOFTWARE, PROJECTS, SCHEMATICS, INFORMATION, SOURCE CODE, SAMPLES, FILES, 3D MODELS AND PRODUCTS ARE PROVIDED "AS IS", WITHOUT WARRANTY OF ANY KIND, EXPRESS OR IMPLIED, INCLUDING BUT NOT LIMITED TO THE WARRANTIES OF MERCHANTABILITY, FITNESS FOR A PARTICULAR PURPOSE AND NONINFRINGEMENT. IN NO EVENT SHALL XNL FUTURE TECHNOLOGIES BE LIABLE FOR ANY CLAIM, DAMAGES OR OTHER LIABILITY, WHETHER IN AN ACTION OF CONTRACT, TORT OR OTHERWISE, ARISING FROM, OUT OF OR IN CONNECTION WITH THE SOFTWARE, PROJECTS, SCHEMATICS, INFORMATION, SOURCE CODE, SAMPLES, PRODUCTS OR THE USE OR OTHER DEALINGS IN THE SOFTWARE, PROJECTS, SCHEMATICS, INFORMATION, SOURCE CODE, SAMPLES AND PRODUCTS. XNL FUTURE TECHNOLOGIES ASSUMES NO LIABILITY WHATSOEVER AND DISCLAIMS ANY EXPRESS, IMPLIED OR STATUTORY WARRANTY RELATING TO ITS SOFTWARE, PROJECTS, SCHEMATICS, INFORMATION, SOURCE CODE, SAMPLES AND PRODUCTS INCLUDING, BUT NOT LIMITED TO, THE IMPLIED WARRANTY OF MERCHANTABILITY, FITNESS FOR A PARTICULAR PURPOSE, OR NON-INFRINGEMENT. IN NO EVENT SHALL XNL FUTURE TECHNOLOGIES BE LIABLE FOR ANY DIRECT, INDIRECT, CONSEQUENTIAL, PUNITIVE, SPECIAL OR INCIDENTAL DAMAGES (INCLUDING, WITHOUT LIMITATION, DAMAGES FOR LOSS AND PROFITS, BUSINESS INTERRUPTION, PERSONAL INJURY OR DEATH, MATERIAL, OR LOSS OF INFORMATION) ARISING OUT OF THE USE OR INABILITY TO USE THIS DOCUMENT EVEN IF XNL FUTURE TECHNOLOGIES HAS BEEN ADVISED OF THE POSSIBILITY OF SUCH DAMAGES. XNL Future Technologies makes no representations or warranties with respect to the accuracy or completeness of the contents of this publication and reserves the right to make changes to specifications and product descriptions at any time without notice. The information contained herein may be of a preliminary or advance nature and is subject to change without notice. No license, whether express, implied, arising by estoppel or other-wise, to any intellectual property rights is granted by this publication. XNL Future Technologies software, projects, schematics, information, source codes, samples or products are not designed, intended, authorized or warranted for use in or as systems for applications intended to support or sustain life, or in any other application in which the failure of XNL Future Technologies software, project, schematics, information, source code, model, sample, files or product could create a situation where personal injury, death, or severe property or environmental damage may occur. XNL Future Technologies products, projects or samples are not designed nor intended for use in weapon systems, this applies to offense and defense systems. XNL Future Technologies projects and products shall never be used to cause harm to living creatures including but not limited to humans and animals. XNL Future Technologies projects and products shall never be used to cause damage to property of any kind. Any use of XNL Future Technologies projects or products to cause harm, death or damage in any kind is strictly prohibited.
XNL Future Technologies reserves the right to discontinue or make changes to its projects, products or files at any time without notice.
SAFETY-CRITICAL, MILITARY, LIFE SUPPORT, MEDICAL AND AUTOMOTIVE APPLICATIONS DISCLAIMER: XNL Future Technologies products, projects, samples, source-codes, documentation, tutorials, software or any other content is not designed for and will not be used in connection with any applications where the failure of such would reasonably be expected to result in significant personal injury or death (“Safety-Critical Applications”). Safety-Critical Applications include, without limitation, life systems or devices, health (monitoring) equipment, safety or security systems, equipment or systems for the operation of nuclear facilities or other “large impact” facilities. XNL Future Technologies products, projects, samples, source-codes, documentation, tutorials, software or any other content is not designed nor intended for use in government, military or aerospace applications or environments or in any other “high-risk” facility, location or environment.
PCB Order Instructions
This section explains the (recommended) ordering process and settings (at the PCB manufacturer) to order our circuit boards using our provided 'ready-to-use' Gerber (zip) files. We will first give a basic overview for the recommended PCB Manufacturer settings, so that the more experianced users can instantly find what they need, and after this 'settings overview' we will explain more in-depth how you can order our printed circuit boards (PCB's) using the files you can download for our projects, products and packages.
NOTE: The clickable links to JLCPCB are referral links, more information about this at the bottom of the page.
Recommended PCB Ordering Settings (Material, layers etc)
All our boards (unless otherwise stated) are designed for and should be ordered with the following settings:
(Base) Material: FR4
Layers: 2 Layer / Double-sided
PCB Thickness: 1.6mm
PCB Color: Choose whatever you like or stick to the 'official project/product color' 🙂
Outer Copper Weight: Use default of the website you're ordering (often 1oz).
When ordering from JLCPCB and using the zip file which has (JLCJLCJLCJLC) in it's name:
Remove Order Number: Click on [Specify a location]
How to use our files/downloads to order the circuit boards
To order the printed circuit board(s) included in this project, product or package you will first need to download and extract this project or product.
Our project and product folders will often contain several folders/directories, of which one of them should have a name similar to 'Gerber Files (For Ordering-Production)'. If the downloaded project or product only contains one printed circuit board (PCB) then you will often find two archives (zip files) within this folder.
One of these archives will have (JLCJLCJLCJLC) in it's name and the other won't, for example:
ProjectXNL.zip
ProjectXNL (JLCJLCJLCJLC).zip
NOTE: You will only need to use one of these files when ordering, not both. So please read along to find out how this works 🙂
My 'Gerber Files Folder' contains even more folders
If this is the case it just means that the project, product or package you have downloaded consists out of multiple circuit boards (or options/variations you can choose from), you should consult the documentation (or included text file(s) in these folders) of your project, product or package to find out which folder (or PCB's) you will need. Inside each folder for the different Printed Circuit Boards in the project, product or package we will still use the same 'file structure' where there will be two files per PCB (one having '(JLCJLCJLCJLC)' in it's name and the other doesn't).
My Gerber Files Folder only contains one zip file (per part/option)!
This is also a possibility, this just means that we did not created an additional 'Gerber file-set' with PCB's which have JLCJLCJLCJLC on them. We often choose to do this for boards which would be to small to actually place such texts, we will then just let it be up to JLCPB to place the production/batch numbers on them. So if there aren't additional zip files which have (JLCJLCJLCJLC) in their filename(s), then you should just use the zip file(s) which is present in the folder(s).
File difference explanation
- The one which has "(JLCJLCJLCJLC)" in it's file name will have JLCJLCJLCJLC printed on the circuit board.
- The one which does not have "(JLCJLCJLCJLC)" in it's name will not have JLCJLCJLCJLC printed on the circuit board.
Ordering anywhere else than JLCPCB
When you want to order anywhere else than on JLCPCB.com you should always just use the zip file which does not have (JLCJLCJLCJLC) in it's filename.
What does this JLCJLCJLCJLC on the PCB mean?
Well this 'piece of text' tells JLCPCB where they can/should place their (internal) manufacturing/production/batch numbers, which they use for handling your order internally. JLCPCB offers a free service where circuit board designers can specify where JLCPCB can place their 'internal batch/production numbers', this prevents issues where they would for example (accidentally) place these production/batch numbers on an ugly location and thus possibly ruin your 'precious silkscreen artwork' 🙂
Ordering from JLCPCB
When you do want to order at JLCPCB.com you have two options to choose from:
- Pay a bit extra on your order (currently around $1.54) and have JLCPCB remove their manufacturing/production code completely, in which case you should use the file which does not have (JLCJLCJLCJLC) in it's filename.
- Or instead use the file which does have (JLCJLCJLCJLC) in it's filename, in which JLCPCB will use the by us specified location to place the manufacturing/production/batch number(s). We will always (try to) place this text in the least noticeable location or where it would not 'mess' with the rest of our silkscreen design. To be extra clear: When using this option you will have a small 'batch number' printed on the location of your PCB's where we had placed the "JLCJLCJLCJLC marker", but it will save you a bit of money on your order.
IMPORTANT:
If you are ordering from JLCPCB and you are using the zip file which has (JLCJLCJLCJLC) in it's name, then you have to make sure that you search for the 'Remove Order Number' option when ordering your PCB and then select [Specify a location] at this option. Otherwise you might still end up with an 'factory batch number' on your PCB AND have the 'text' JLCJLCJLCJLC printed on it. So make sure that you select [Specify a location]
Price estimate at JLCPCB
Currently (at the time of writing this 'pre-configured order manual template') prices at JLCPCB per PCB Design are around 2$ to $4 if the board is 100x100mm or less, which will get you 5 copies of the board itself for this price. And if you order 10 of the same board you will often just have to pay $5 (so just $1 more for 5 extra boards). We use JLCPCB for nearly all our projects and products and we are very satisfied with their quality and production times. Ordering from JLCPCB is as simple as going to JLCPCB.com then 'drag-and-drop' your zip file (with the Gerber files) onto the page.
NOTE: The clickable links to JLCPCB in this section are referral links
PCB Sponsor Update/Referal Link Information:
Since July 2024 JLCPCB is now sponsoring my projects, platform and YouTube channel, I'm very grateful for JLCPCB offering to sponsor me (they actually contacted me, I did not contacted them). Despite the fact that they are now sponsoring my/our projects, my opinion about them remains unchanged and will also state that my recommendation to use JLCPCB is 100% my own. If I would not have used (and loved) their service that much myself already I would not have accepted their offer either. The reason I accepted their sponsor offer is because I had already been using them for many years with great satisfaction.
If you click on the referral link I will NOT be able to see that you have clicked it (I will not get any user or order details from them), and neither would you pay more when using their link for example. Using the referal link does however support my projects, content and platform 🙂
You can also use JLCPCB for FR-4 boards up to 20 layers, Flex pcb's and assembly of your PCB's (meaning they will put the components on them for you, I personally haven't used the latter (yet) though).
Features
These are the main features of the XNL Breadboard I/O (when using the recommended components):
- It’s an great way to instantly get your project going by just plugging-in one USB cable into your breadboard without having to setup all the rails, the lab power supply, add a voltage and current meter etc.
- It has an onboard ‘proxy’ USB port for your programmer board like the XNL LABUNO Overkill Edition or an Arduino® for example, which means you don’t lose an ‘additional USB port’ on your PC/laptop just to power the breadboard.
- It has an build-in 500mA over current/shortcircuit protection on the 5V power supply to your breadboard (which can be turned off with a DIP Switch), which will not only help in keeping your USB port safe, it will in lots of cases also be able to save your components when you’ve made a mistake.
- It has an onboard 3.3V regulator so you instantly have a stable full rail of 3.3V available on your breadboard for your projects.
- It has two break-out USB ports (a USB A and a USB B connector), which make it super easy to connect USB devices to your breadboard, but also (USB B) makes it super easy to have a (secondary) USB client port for your project(s).
- It has a DC Jack which can be used for other external voltages like 12V, 24V etc (note: DO NOT use it with AC adapters! this because the ground between 5V, 3.3V and the Jack is shared!).
- Maximum recommended current: around 500mA (do make sure to read my warning about the DIP Switches in the datasheet though!!)
- It has two onboard voltage and current displays, where one shows the voltage and current for the 5V input (from the USB) and the other one shows the voltage and current for the DC Jack.
For me/us personally, the breadboards with these modules installed on them have saved us A LOT of time when resuming projects another day, or when we needed to switch between projects.
Bill Of Materials
Bellow you’ll find a list of the components you will need to build/make your own XNL Breadboard I/O
NOTE: This list does NOT contain the voltage displays needed to make the entire unit, it does not contain the jumper/telephone wire which we often use to make the breadboards and neither does it contain the breadboard.
Required components list:
The checkboxes in this table can be used when you for example printed (or copy-pasted) this table so that you can ‘check-off’ the items which you have, have ordered or ‘are in’ (from ordering). The website does NOT remember/stores it when you ‘tick something off’ on this page!
| XNL Breadboard I/O | |||
|---|---|---|---|
| Got It | Quantity | Part/Item | Footprint/Size & Notes |
| XNL Breadboard I/O PCB(0) | Custom | ||
| 1 | 2x1M Pin Header(1) | 2.54mm standard pitch | |
| 4x1M Pin Header(1) | 2.54mm standard pitch | ||
| 2 | USB A (Female) Connector | Through Hole | |
| USB B (Female) Connector | Through Hole | ||
| 4 | 1Pos DIP Switch (SPST)(2) | Through Hole | |
| 1 | Red SMD LED | 0805 (SMD/SMT) | |
| Blue SMD LED | 0805 (SMD/SMT) | ||
| Green SMD LED | 0805 (SMD/SMT) | ||
| 4 | 1K SMD Resistor | 0805 (SMD/SMT) | |
| 100nF SMD Capacitor | 0805 (SMD/SMT) | ||
| BC857A PNP Transistor | SOT-23 (SMD/SMT) | ||
| 470nF SMD Capacitor | 0805 (SMD/SMT) | ||
| 6.3V 2200µF Capacitor(3) | Through Hole | ||
| LM3940 3.3V Regulator(4)(5) | DDPAK/TO-263-3 or SOT-223-3 | ||
| Power Jack Connector(6) | Custom | ||
| 1206 500mA PTC(7) | 1206 SMD/SMT | ||
| LM3940 3.3V Regulator(4)(5) | DDPAK/TO-263-3 or SOT-223-3 | ||
| BC857A PNP Transistor | 1206 (SMD/SMT) | ||
By: XNL Future Technologies |
|||
(0) The XNL Breadboard I/O PCB files are included in the download. Both the ‘source files’ of the board are in the download and the Gerber files (as zip) which can be used directly to order the PCB without ever needing to use any circuit design (CAD) software.
(1) These headers can either be male of female. We recommend that you choose the header that suits your needs. For example if you don’t own male → female Dupont (breadboard) cables, then you should not use male pin headers.
(2) Some suitable components numbers which can be used as a reference: 732-3831-5-ND (Digikey), NDS-01-V (Apem) or Conrad DS-01 DIP Switch.
(3) Any capacitor with a decent value will do. Minimum required by the 3.3V regulator is 33µF but we recommend to use a (much) higher value to ensure a stable 3.3V line under heavy load. For example a 25V 1000µF will also work. You should make sure though that the voltage of the capacitor is at least 6.3Volt (higher is better). We also recommend to take a look at the LM3940 data sheet to ensure that your capacitor meets the ESR requirements.
(4) You could replace the LM3940 with a regulator of your own choice, do realize though that you then also might be required to use other capacitors for the Voltage/Low-Dropout Regulator (LDO).
(5) We recommend using the TO-263-3 package and that you solder it to the plane provided on our PCB for optimal performance, stability and temperature control.
(6) This is a “standard” (female) Power Jack which can be used to connect AC→AC or AC→DC adapters (transformers) to your breadboard. For example to connect a 9V DC adapter. The part that we used for this connector is: SPC4078 by SPC Technology
(7) “Any” decent (and fast) 500mA Resettable fuse (PPTC) should be usable, we recommend a Hold current of 0.5A (500mA) and a MAX Trip current of 1A. We do recommend to stick to the 500mA since this is intended to protect the USB port of the computer. This PTC will only “protect” the 5V output of the XNL Breadboard I/O! We do not recommend to bypass the fuse with a wire for example since you can already disable/override the fuse with one of the on-board DIP switches when necessary.
IMPORTANT NOTE IN REGARDS TO THE DIP-SWITCHES!
Please note that back at the time when I developed this board, I did not realized that DIP switches are generally rated for currents around 20-25mA! I have however been using this project/product for over 10 years now, and never had any issues with the currents I’m using on my breadboards (500mA maximum!). I do always use high quality dip switches for this board though. If you are having issues with your dip switches or you might be concerned that they will be a problem, then it is recommended that you just bridge the connections of your dip-switches (meaning you leave them out and install a fixed wire instead)
Known Bugs & Issues
Not really a bug or issue (for me/us at least), but do want to be 100% transparant about possible issues with a certain part of this design/board.
Like I’ve also mentioned in the datasheet (which is in the download) and in the YouTube video: DIP Switches are generally rated for a about 20-25mA! Back in the day (about 10 years ago now) when I designed this board, I completely overlooked this fact and have been using them always with the DIP Switches on them. I personally never had any issues with my breadboards and the XNL Breadboard I/O’s using the DIP switches, the maximum currents I’m usually using on my breadboards is around 500mA (with short spikes once in a while to even 1.5 to 2Amps during an accidental short for example). This however obviously isn’t a guarantee that your DIP Switches will work and won’t cause issues for you.
So please keep this in mind and consider just bridging the connections of the switches with wire, or consider removing them IF you get issues due to them.
Yet again: I never had any issues with or due to the DIP Switches, but it is important to realize that officially I’m using them far beyond their rated limits!
Only logged in users who have downloaded this project/product can leave a review.
Reviews
There are no reviews yet, be the first one to add a review.